
User Guide
Dicta — Privacy-First Voice Dictation
Video Guide
Watch the full setup and usage walkthrough, then follow the written steps below.
Playing this video loads YouTube, which may set its own cookies.
Download & Installation
Follow these steps to download, install, and set up Dicta on your Mac. The whole process takes about two minutes.
Download Dicta
Click Download Free Trial on the Dicta page. The DMG file (about 3.6 MB) will download to your Downloads folder. Your 14-day free trial starts when you first launch the app — not when you download it.
Install Dicta
Double-click Dicta-1.1.dmg in your Downloads folder. A window opens showing the Dicta icon and an Applications shortcut. Drag Dicta onto Applications to install it, then eject the disk image.
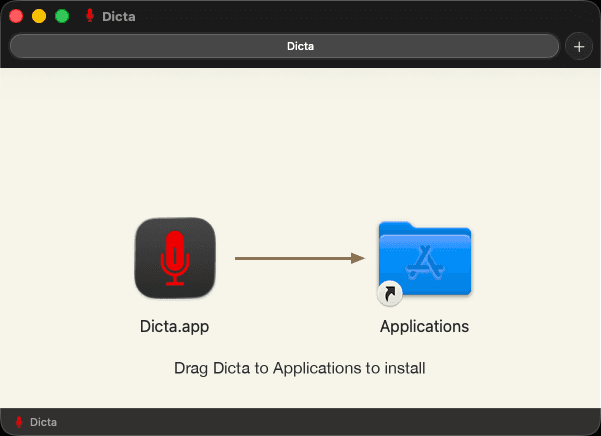
Drag the Dicta icon onto the Applications folder to install.
Open Dicta for the first time
Open your Applications folder and double-click Dicta.
macOS will show a one-time confirmation dialog for apps downloaded from the internet. Click Open. Dicta is notarised and verified by Apple — this prompt is normal and will not appear again.
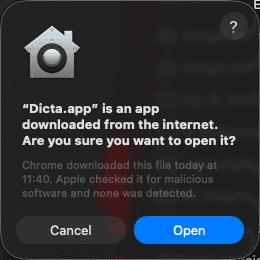
Click Open. This prompt only appears once.
Grant permissions in the Setup wizard
The Set Up Dicta window opens automatically. It shows three items: Microphone, Keyboard Access, and Speech Model. You need to grant Microphone and Keyboard Access.
Speech Model: If this is your first time installing Dicta, the speech model will download automatically in the background — you will see a progress indicator next to Speech Model. This is a one-time download (around 700 MB for the Fast model). You can grant permissions while it downloads; Dicta will be ready to use once the download completes.
4a — Allow Microphone Access
Click Allow Microphone Access (highlighted in the setup window). macOS will show a permission prompt — click Allow.
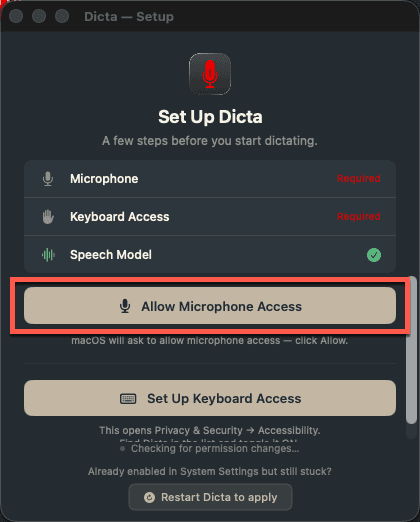
Click the highlighted button in the setup window.
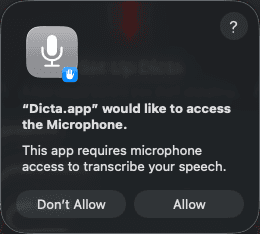
Click Allow on the macOS prompt.
Once granted, the Microphone row turns green. The setup window automatically highlights the next step.
4b — Set Up Keyboard Access
Click Set Up Keyboard Access. This allows Dicta to detect your hotkey and insert text into other applications. A macOS permission dialog will appear — click Open System Settings.
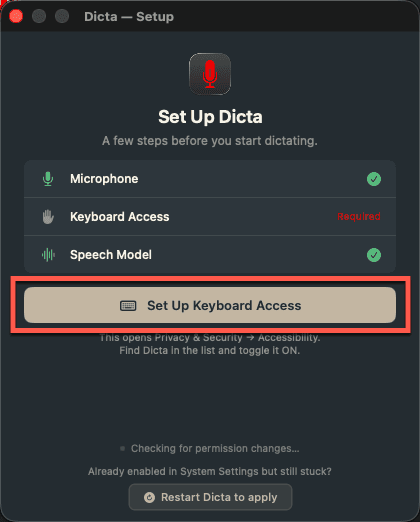
Click the highlighted Set Up Keyboard Access button.
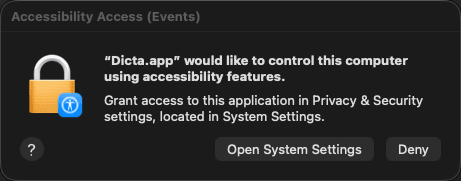
Click Open System Settings.
4c — Enable Dicta in System Settings
System Settings opens to Privacy & Security → Accessibility. Find Dicta in the list and toggle it ON. You may be asked for your Mac password.
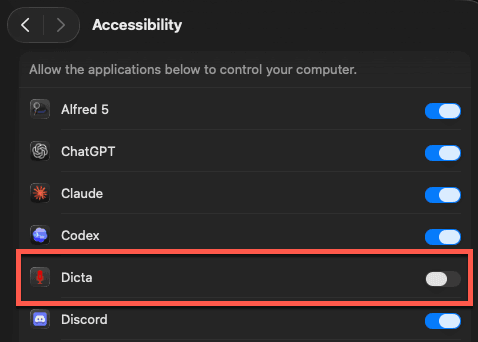
Dicta is listed but the toggle is off.
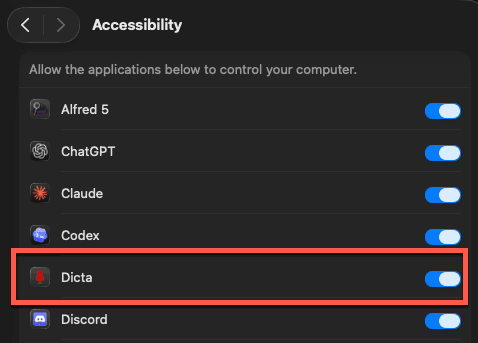
Toggle Dicta on. The switch turns blue.
4d — Restart Dicta to apply
Return to the Dicta setup window. Click Restart Dicta to apply (highlighted). Dicta will quit and relaunch automatically, picking up the newly granted permission.
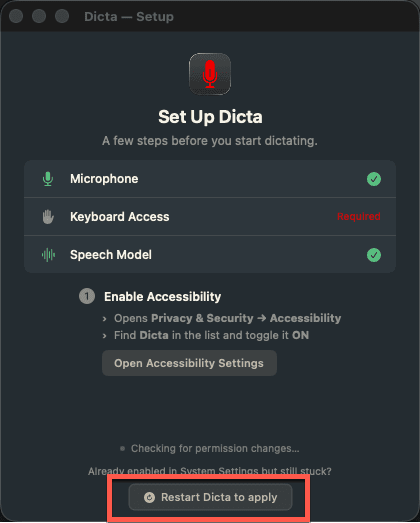
Click the highlighted Restart Dicta to apply button.
4e — Setup complete
After restarting, all three items show a green tick and the setup window confirms You're all set. Click Close. Dicta is ready to use.
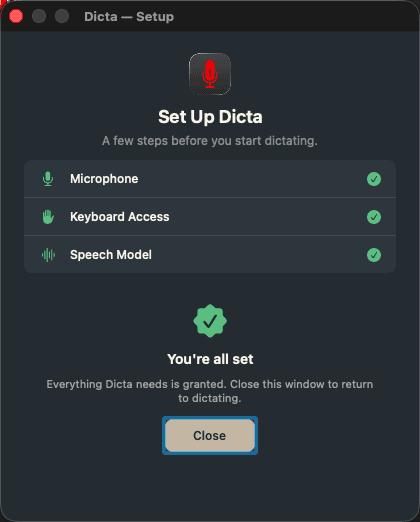
All permissions granted. Click Close to start dictating.
The Dicta Interface
Click the Dicta icon in your menubar at any time to open the control panel. Here is what each section does.
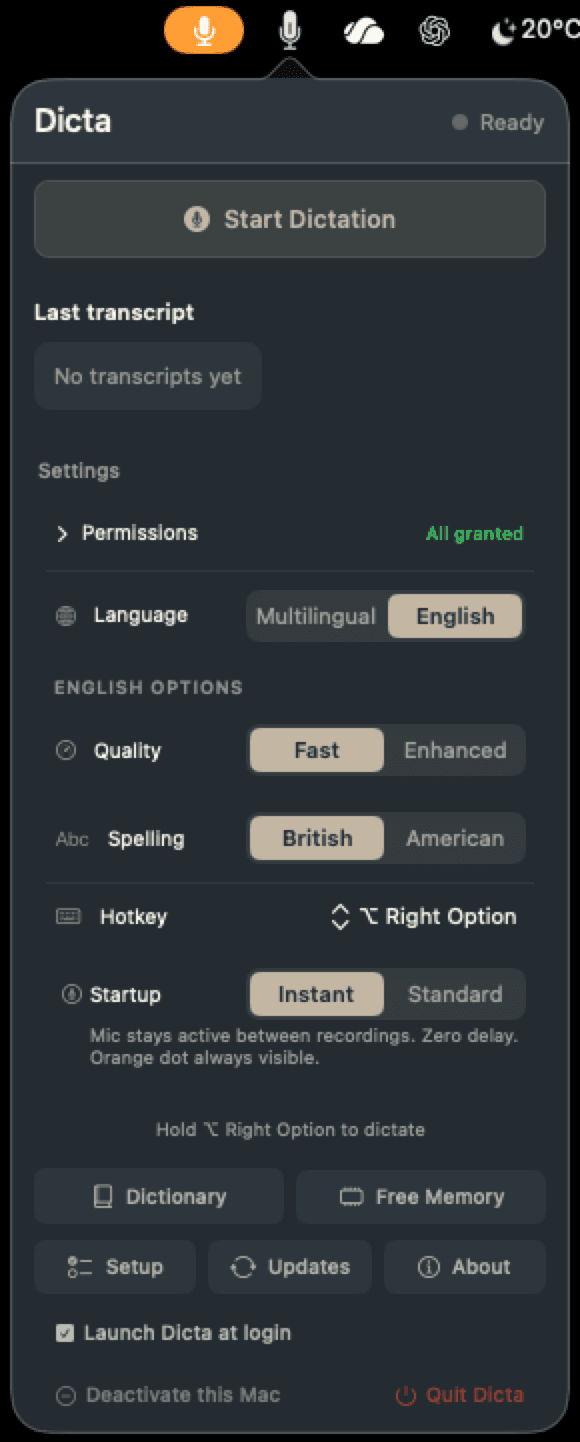
The full Dicta control panel.
Status indicator
“Ready” (grey dot) means Dicta is idle and waiting for your hotkey. The dot turns red while actively listening, and shows a loading indicator while processing your speech.
Trial countdown
During the 14-day trial, the panel shows a countdown of the days remaining, with a Buy Now button to purchase and an Activate key option if you have already bought and received your licence key by email. Once your licence is active (as shown above) this row disappears — no countdown, no purchase prompt.
Start Dictation button
An alternative to the hotkey. Click this button to begin dictating hands-free. Click it again (or press your hotkey) to stop. Most users prefer the hotkey once they are comfortable with it.
Last transcript
Shows the text from your most recent dictation. Useful to check what was captured if the text was inserted somewhere you cannot easily see it.
Tip: Every dictation is also automatically copied to your clipboard. If you forgot to place your cursor first, just switch to the correct app and paste with ⌘V.
Settings
Permissions
Expand to check the status of Microphone and Accessibility grants. Shows green when all required permissions are granted. If something shows as missing, click Setup at the bottom to re-run the wizard.
Language
English is the recommended, fastest mode and what most people use. Multilingual (Beta) supports over 90 languages but is experimental — slower, and it may occasionally need a re-dictation. It downloads an additional 1.5 GB model on first use.
Quality (English only)
Fast — the default and recommended mode. Quick and accurate for most dictation (600 MB model). Enhanced (Beta) — experimental: aims for higher accuracy but is noticeably slower and can occasionally over-correct, so you may need to re-dictate. Both are fully local.
Spelling (English only)
Choose between British and American English spelling conventions (e.g. colour vs. color, analyse vs. analyze).
Hotkey
The key you hold to start dictating. Default is Right Option (’⌥’). Press and hold to dictate; release to stop. Double-tap quickly to lock dictation on hands-free; tap once to stop.
Startup mode
Instant — the microphone stays warm between recordings. Zero delay, but the orange microphone badge stays visible. Standard — the mic pauses after each dictation. Small startup delay (~30ms), but the badge disappears between recordings.
Bottom buttons
Dictionary — open the Custom Dictionary to teach Dicta how to spell words it often gets wrong.
Free Memory — unload the speech model from RAM. Useful if you need to free up memory for another task. The model reloads automatically next time you dictate.
Setup — re-open the setup wizard if permissions need to be re-granted.
Updates — check for a new version of Dicta.
About — view the version number, open-source licences, and links to support and the website.
Launch Dicta at login
Tick Launch Dicta at login at the bottom of the panel and Dicta starts automatically and waits quietly in your menubar each time you log in to your Mac — ready to dictate without you having to open it. Untick it to launch Dicta only when you open it yourself.
Deactivate this Mac
Once your licence is active, Deactivate this Mac appears at the bottom of the panel. It releases this Mac’s activation so you can use your licence key on a different machine — handy when you replace or sell a Mac. You can re-activate the same key here again at any time.
Expand the Permissions row to see the status of each grant at a glance. Both should show green before dictating.
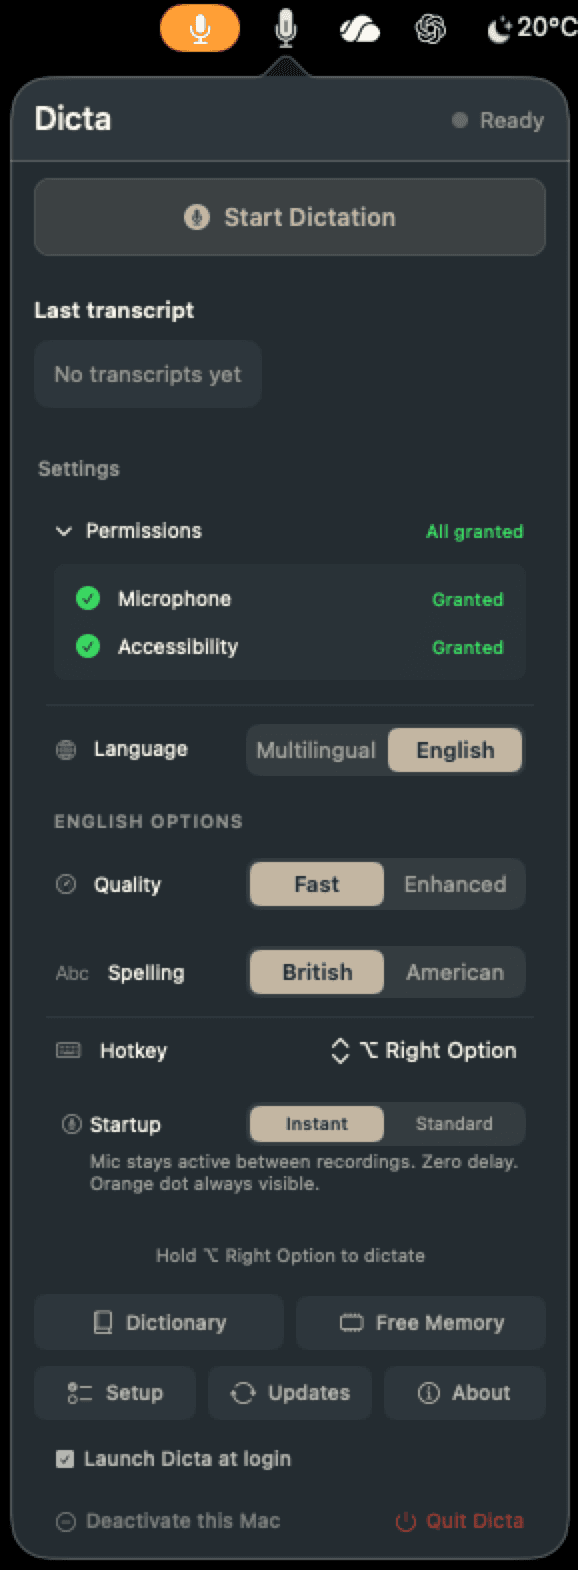
Microphone and Accessibility both granted — ready to dictate.
Activating Your Licence
After purchasing Dicta, you will receive a licence key by email in the format XXXX-XXXX-XXXX-XXXX. To activate:
- Click the Dicta menubar icon to open the control panel.
- Click Activate key.
- Enter your licence key exactly as it appears in your email.
- Click Activate.
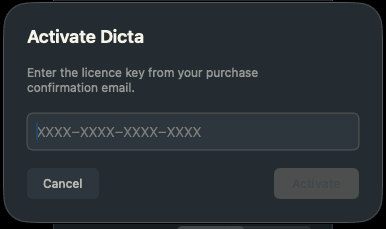
Enter the key from your purchase confirmation email.
Dicta can be activated on up to two Macs per licence. If you need to move your licence to a new machine, contact support.
Custom Dictionary
Whisper occasionally mishears proper nouns, brand names, or technical terms. The Custom Dictionary lets you correct this by teaching Dicta what you actually mean when it hears a specific phrase.
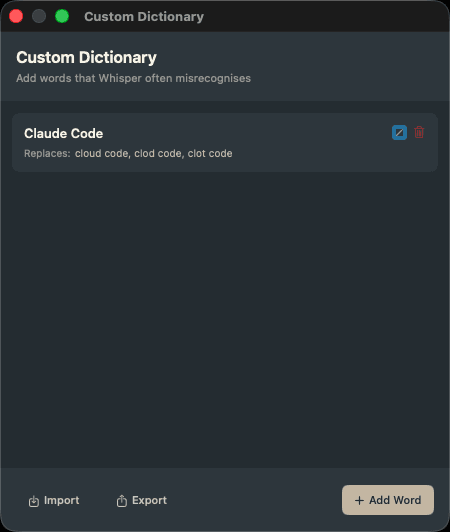
The Custom Dictionary. Each entry shows the correct word and the variants it replaces.
Click + Add Word to create a new entry. Enter the correct spelling and the variants Whisper often produces (comma-separated). Dicta will automatically substitute the correct spelling whenever a variant is transcribed.
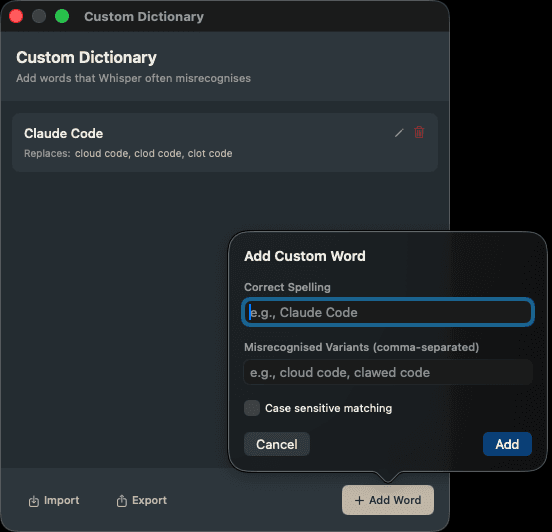
Example: 'Claude Code' replaces 'cloud code', 'clod code', and 'clot code'.
Use Import and Export to back up your dictionary or transfer it to another Mac.
Checking for Updates
Dicta checks for updates automatically. You can also check manually at any time by clicking Updates in the control panel. If a new version is available, Dicta will download and install it for you. If you are already on the latest version, you will see a confirmation.
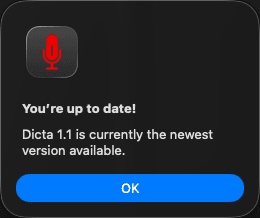
Dicta confirms when you are on the latest version.
How to Dictate
Basic dictation
- Click into any text field — Notes, Mail, a browser, any app that accepts text.
- Hold your hotkey (default: Right Option) to start recording. The menubar icon turns red.
- Speak naturally.
- Release the hotkey to stop recording. Dicta processes your speech and inserts the text.
Lock mode (hands-free dictation)
Double-tap your hotkey quickly to lock dictation on. The mic stays active without holding anything. Tap the hotkey once to stop and insert the text. Useful for long-form dictation.
Voice formatting commands
Say these phrases to insert formatting instead of text:
| Say | Inserts |
|---|---|
| “new paragraph” | Two line breaks (paragraph break) |
| “new line” | Single line break |
| “bullet point” | A bullet character (•) |
Menubar icon states
White icon
Idle — ready to dictate.
Red icon
Actively listening — speak now.
Hourglass
Loading the speech model — ready shortly.
macOS shows an orange microphone badge in the menu bar whenever the microphone is in use — this is a system-level privacy indicator controlled by Apple, not Dicta. In Standard mode it disappears after each dictation. In Instant mode it stays on while Dicta is running.
Troubleshooting
Symptom: Pressing your hotkey does nothing — no recording starts.
Solution:
- Open System Settings → Privacy & Security → Accessibility and ensure Dicta is listed and toggled on. If it is not listed, click “+” and add Dicta from your Applications folder.
- If Dicta is already listed, toggle it off, then back on (this resets the permission).
- Quit and relaunch Dicta, or use the Restart button in Setup.
- Try pressing and holding the hotkey for at least half a second.
- If the issue persists after waking from sleep, quit and relaunch the app (see “Hotkey Stops After Sleep” below).
Symptom: You see Dicta processing your speech, but no text appears in the target application.
Possible causes:
- Accessibility permission not granted
- Target application does not accept text input
- Cursor is not in a text field
- Secure input field (e.g. password field) is focused
Solution:
- Ensure Dicta has Accessibility permission: System Settings → Privacy & Security → Accessibility → Dicta must be toggled on. If not listed, click “+” and add it.
- Click directly into a text field before dictating.
- Try a different application (e.g. Notes or TextEdit) to isolate the issue.
- If the text field is a password field, Dicta will not insert text for security reasons.
- Quit and relaunch Dicta if the problem persists.
Tips for better accuracy:
- Speak clearly and at a natural pace — avoid rushing.
- Reduce background noise — close windows, move away from fans or machinery.
- Use an external microphone if your built-in microphone picks up too much ambient noise.
- Speak in full sentences rather than isolated words — the model uses context to improve accuracy.
- Switch to Enhanced quality in Settings for technical vocabulary or accented speech.
Symptom: Dicta does not appear in the menubar after launch.
- Check that Dicta is running — open Activity Monitor and search for “Dicta”.
- If your menubar is full, some icons may be hidden. Try holding Command and dragging icons to make space.
- Quit and relaunch the app.
Symptom: The hotkey works normally, but stops responding after your Mac wakes from sleep or after extended idle.
Workaround:
- Quit Dicta completely (click the menubar icon → Quit Dicta).
- Relaunch Dicta from Applications.
- The hotkey should respond immediately.
This is a known limitation of how macOS handles global event taps across sleep cycles. We are working on an automatic recovery mechanism.
Immediate solution: Force quit Dicta from Activity Monitor or by pressing Command + Option + Escape, then relaunch.
Help us fix it:
- Note what you were doing when the crash occurred.
- Note the application you were dictating into.
- Submit a support request with a description so we can investigate.
Compatibility
System: macOS 14.0 (Sonoma) or later
Processor: Apple Silicon (M1 or later). Intel Macs are not supported.
Language: English (Fast and Enhanced quality). Multilingual mode adds support for 90+ additional languages via a separate downloadable model.
Apps: Works with any Mac application that accepts text input.
Performance & Hardware
Dicta runs a speech recognition model entirely on your Mac. Transcription speed depends on your hardware — Macs with more RAM and a faster Neural Engine will process speech more quickly.
Minimum: 8 GB RAM, macOS 14.0 (Sonoma) or later, Apple Silicon (M1 or later)
Recommended: 16 GB RAM or more for the best experience, particularly in Multilingual mode
Storage: Approximately 700 MB for the Fast model; 1 GB for Enhanced; 1.5 GB additional for Multilingual
On 8 GB Macs, you may experience slightly longer processing times for longer recordings. Closing memory-intensive applications can help.
Frequently Asked Questions
Do I need an internet connection?
Dicta processes everything locally on your Mac. An internet connection is only needed once — to download the speech model when you first launch the app. After that, Dicta works entirely offline and no internet connection is required.
Do I need to create an account?
No. There is no account, login, or registration. Just install and start dictating.
Is there a subscription?
No. Dicta is a one-time purchase. All future updates within the current version are included.
What languages are supported?
English is the primary, recommended language and what most people use. Multilingual mode (currently in beta) is available — select it in Settings and Dicta downloads a larger model (about 1.5 GB) supporting 90+ languages. As a beta feature it's slower and may occasionally need a re-dictation; we're actively refining it.
What is the difference between Fast and Enhanced quality?
Fast is the default, recommended mode — the distil-whisper model (~600 MB), quick and accurate for most English dictation. Enhanced (currently in beta) uses a larger model aiming for higher accuracy, but it's noticeably slower and can occasionally over-correct, so you may need to re-dictate. We recommend Fast for everyday use. Both are fully local.
How accurate is the transcription?
Dicta uses the Whisper speech recognition model, which provides high accuracy for clear speech in quiet environments. Speaking in full sentences improves results. Fast (the default) is accurate for everyday use; the Enhanced setting is a beta option still being refined.
Why does Dicta need Accessibility permission?
Accessibility permission allows Dicta to insert dictated text into the application you are typing in. Without it, text insertion will not work. Dicta uses the same approach as other Mac dictation tools — it simulates a paste action to place text wherever your cursor is.
Can I change the hotkey?
Yes. Click the Dicta menubar icon, go to the Hotkey setting, and choose from presets (Right Option, Right Command) or record a custom key combination.
Does Dicta store my recordings?
No. Audio is processed in real time and discarded immediately after transcription. Nothing is saved to disc.
What if I forgot to place my cursor before I dictated?
Every time you dictate, Dicta automatically copies the transcript to your clipboard as well as inserting it. So even if the cursor wasn't in the right place, your text is still there — just switch to the correct app and paste (⌘V). You can also find the last few transcripts in the History section inside the Dicta panel.
Why is there an orange microphone icon in my menu bar?
The orange microphone badge is macOS's built-in microphone activity indicator — it appears whenever any app is using the microphone. In Standard mode it disappears a couple of seconds after you finish dictating. In Instant mode it stays on while Dicta is running. Either way, everything is processed locally and nothing leaves your Mac.
What is Instant mode vs Standard mode?
Both are fully local and equally private. Instant keeps the microphone active between recordings so dictation responds with no startup delay — the orange microphone badge stays on while Dicta is running. Standard pauses the microphone a couple of seconds after you finish dictating — the badge disappears between recordings, and there may be a brief delay (~30ms) when you start your next dictation.
What is the Custom Dictionary?
The Custom Dictionary lets you teach Dicta how to correctly recognise words or phrases it often gets wrong. For example, you can tell it that 'cloud code' and 'clod code' should both be corrected to 'Claude Code'. Click Dictionary in the Dicta panel to manage your entries.
Still stuck?
If the guide didn't help resolve your issue, please submit a support request and we'll look into it.
Get Support